Make a Bird Bath Centerpiece

      Comments Off on Make a Bird Bath Centerpiece

Once again, this is so fun to make! You can use this birdbath as a centerpiece and fill it with candy, flowers, or whatever you want! 

Supplies:

  • paper mache flower pot
  • small round paper mache box with lid
  • large round paper mache box with lid
  • acrylic paint
  • spray acrylic sealer
  • Mod Podge
  • embellishments  (I used chipboard birds, vines, and leaves and created a bunch of paper flowers)

Instructions:

  • paint paper mache pieces
  • Mod Podge pieces together
  • spray with acrylic sealer and allow to dry
  • adorn with embellishments 


Howdy, Folks! Guest-Room Pass-Along Frame

      Comments Off on Howdy, Folks! Guest-Room Pass-Along Frame

I adorned a basic frame with ribbon roses and embossed chipboard letters to make this guest room pass-along frame.  Display it in your guest room and then allow your guests to take it home with them to pass it along to their guests, and so on, and so on.

Come back tomorrow for the ribbon rose tutorial.

More Catch-Up

      Comments Off on More Catch-Up

The Past Week In Review:

1)  Made it to Week 2 of “So You Think You’re Crafty.”  Voting starts again tomorrow.  To vote, click HERE.  Sorry, I can’t tell you which project is mine!  Take a really good guess.  The competition really isn’t about winning for me, it’s about not getting eliminated.  I want to stay in as long as I can because I have some really cool projects planned for the upcoming weeks (we got to know the themes in advance, even before we auditioned, which is good because it gave me time to think.)

2)  Went with Adrienne to register for her first college class.  She is dual-enrolling in macro-economics.  Neil has a degree in economics.  I have a D-minus on my college transcript in economics.  (But I have an “A” in a class I took called “Personal Clothing Selection” when I was a fashion merchandising major.)

3)  Went with Erica to register for high school.  She gets her driving permit in six months.  And I’m still eighteen years old!

4)  Going to NYC soon to watch Erica and her school band perform in this year’s Heritage Festival at Riverside Church.  I’m not going as an official chaperon; Neil and I are just going to meet up with her and the group but do our own thing when they go back to their hotel.

5)  Taking medicine for my blood pressure problem.  I feel like my heart is going to explode out of my chest!  It hasn’t raised my blood pressure one bit, even though the doctor doubled the dosage.  Another side effect of the med is that I have goose bumps 24/7.  Bizarre!  I’m also getting weekly B-12 shots from my courageous neighbor (Beck-Beck) who was kind enough to go to the doctor with me to learn how to give the shots.

6)  Held my friend Meghan’s three-month-old baby boy today at church while he slept on my shoulder and sucked his thumb!  Makes my boobs feel like they are filling with milk whenever I hear newborn baby sucking noises!  TMI, I know, sorry!

7)  Don’t forget to vote!  Click HERE!

Oh!  Thanks for voting last week!  I hope you voted for this:

Patio Table Tutorial

      Comments Off on Patio Table Tutorial

Here you go!  Have fun!  If you have any questions, send an email to [email protected]

 Supplies for Patio Table:

1) 12” x 12” piece of ½”- thick foam board 
2) #13 knitting needle
3) 4-7/8” half-ball of florist’s foam (or something to stick the knitting needle into in case you make the hole too big in the shaker box; if you are careful when you make the hole, you might not need this)
4) 2 sizes of round dishes for tracing; one with a 10” diameter, the other with a 12” diameter
5) 6” tall x 5” round shaker box with lid
6) this is the UPC code for the shaker box so you know the correct size to buy
7) utility knife
8) mod podge

***you’ll also need an assortment of 12” x 12” decorative paper*** 

1) Trace the 10” plate onto the foam board
2) Cut out circle with utility knife (don’t worry if it looks raggedy; you are going to be covering the ugly part with paper)
3) Draw a little circle in the center
4) Carefully poke a hole in the center with the tip of the knitting needle; remove the needle and set needle aside for later use


1) Drill or punch a hole into the center of the lid to the shaker box. Make sure you make the hole just big enough so that you can insert the knitting needle. (Be careful not to make the hole too big.)
2) Cut two strips of decorative paper 12” x 6” and adhere to shaker box with mod podge
3) Look how pretty!
4) Cut two strips of decorative paper 12” x 1” and adhere to the side of the shaker box lid (you don’t have to put any paper on the top of the lid)

1) Cut two strips of decorative paper 12” x ¾” and adhere to the side of the table top (it’s not going to look very pretty, but that’s okay. You are going to hide it later)
2) Put some Mod Podge on the top of the shaker box lid
3) Attach the table top to the shaker box lid, making sure to line up the holes
4) Allow to dry

1) Trace the 12” plate onto a piece of decorative paper and cut out. Then trace the 10” plate onto the 12” circle that you just cut out.
2) Cut a fringe up to the trace-line around the entire diameter of the 12” circle
3) Punch a hole in the center and adhere to the table top

That’s it for the table. Let’s move on to the umbrella.

Supplies for umbrella:

Steps for umbrella pieces:

1) Die-cut six large pennants. Cut 2 each of 3 different paper patterns
2) Cut off the side scallops, leaving the top two scallops on each side, as shown

3) Die-cut six large cardboard pennants
4) Cut off the entire bottom and the scallops on the cardboard pieces as shown
5) Die-cut six large pennants from the plain cardstock
6) Glue the decorative-paper pennants onto the plain-paper pennants as shown

Steps for umbrella assembly:

1) Fold up scallop edges along perforated lines and apply mini glue dots to scallops
2) Attach scallop edges of umbrella pieces together
3) This is what it will start to look like as you attach the pieces to each other
4) This is what it will look like underneath
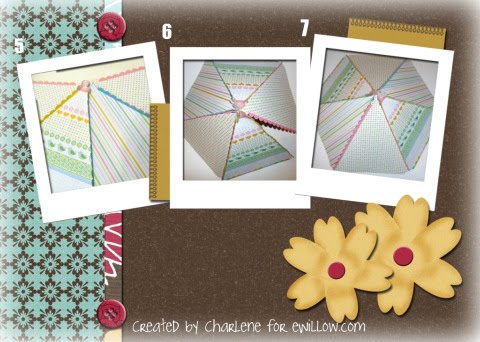
5 to 7) Continue attaching all umbrella pieces, making sure to rotate colors

Now let’s reinforce the umbrella. We’re almost finished!


1) This is what the underneath of the umbrella looks like after you attach all of the pieces

2) To reinforce the umbrella, we are going to use the cardboard pennant pieces. Apply double-sided tape to each cardboard pennant piece. Adhere each cardboard piece to the underside of the umbrella so that one half of the cardboard piece is attached to one half of an umbrella piece.
3) Line up the score line of the cardboard piece with the place where the umbrella pieces are attached
4) Continue until all cardboard pieces are attached
5) Apply a couple of pop-up glue dots (or another very strong gummy adhesive) to the top of the knitting needle
6) Stick the knitting needle onto the center of the umbrella, insert the needle into the table top, and you’re done! Whew!


For the place settings, the possibilities are endless. I used plastic shot-glasses for the cups and used some die-cut flowers from the “Baskets and Blooms” die for decorations.

Gather These Supplies to Make a Doll-Sized Patio Table

      Comments Off on Gather These Supplies to Make a Doll-Sized Patio Table

Next week we’ll get started on making this cute table! 

 Supplies for Patio Table:

1) 12” x 12” piece of ½”- thick foam board 

2) #13 knitting needle

3) 4-7/8” half-ball of florist’s foam (or something to stick the knitting needle into in case you make the hole too big in the shaker box; if you are careful when you make the hole, you might not need this)

4) 2 sizes of round dishes for tracing; one with a 10” diameter, the other with a 12” diameter

5) 6” tall x 5” round shaker box with lid

6) this is the UPC code for the shaker box so you know the correct size to buy

7) utility knife

8)  mod podge

***you’ll also need an assortment of 12” x 12” decorative paper*** 


 Supplies for umbrella:


 Tutorial Coming Monday!!

(I realize it might be difficult to obtain the Sizzix machine and Sizzix pennant die.  Send me an email and I can help you with the pennant pieces.  [email protected])