Paper Cake Treat Boxes (Part 3): A New Design

      Comments Off on Paper Cake Treat Boxes (Part 3): A New Design


I’m so happy that so many of you have found the Paper Cake Treat Boxes template and tutorial so helpful.  It’s a great thing when a new creation is born, and I’m so excited that eWillow.com can help you in your creative endeavors by making your party planning a little easier. 


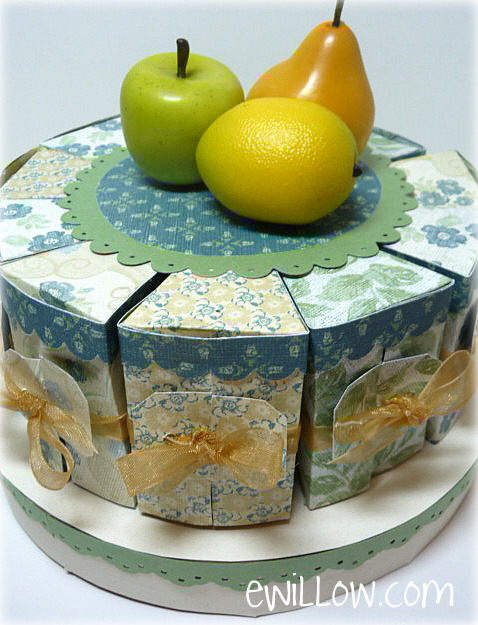
I’m happy to share with you another version of the paper cake.  It is a great item to make if you are hosting or attending a small luncheon.  It would make a great centerpiece or hostess gift.  You can fill each piece with delicious chocolate truffles.

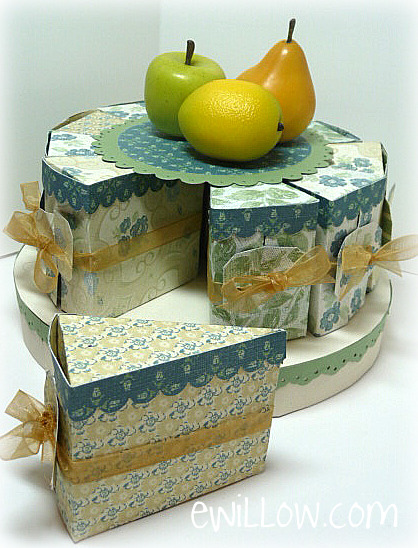
For this cake, you will only need to use the template for the top layer of the cake (the smallest template.)

  • Click HERE for the template and tutorial.
  • Click HERE for photos of the three-layer cake.
  • If you have a Cricut machine with the ability to connect your machine to your computer, click HERE for the template. 
  • You will need to print 11 pieces of the top layer.

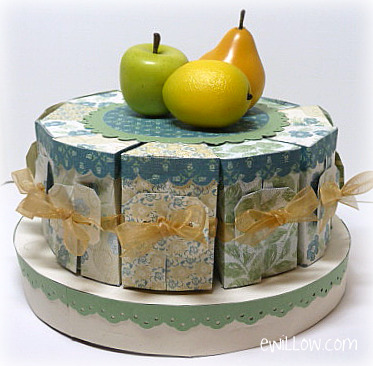
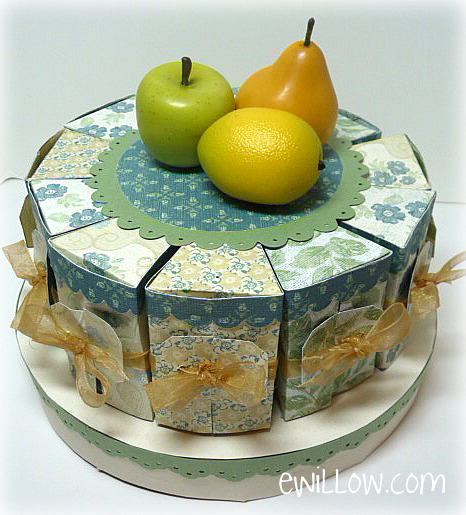
For the cake plate, I used the lid to a round paper mache box.  All I did was wrap strips of cardstock around the edge, cut a circle to cover the top, and added a scalloped trim.

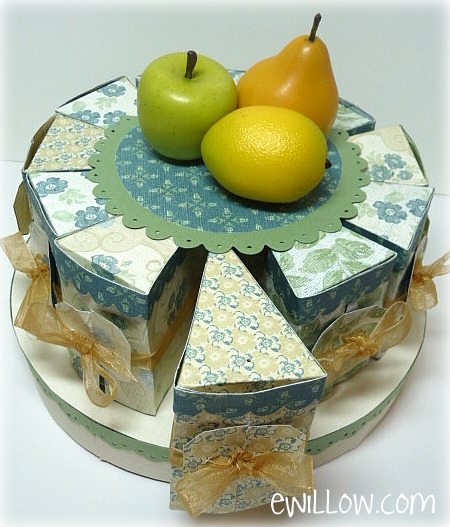
For this cake, I didn’t attach the pieces to each other like I did with the three-layer cake.  If you are transporting the cake, you could use a little piece of double-sided tape to make sure the cake pieces stay together, but if you aren’t moving the cake, there really isn’t any need to adhere the pieces to each other.

I die-cut a large scallop circle and then cut out a smaller circle to make a solid layer on the top of the cake.  I purchased a box of miniature plastic fruit over a year ago on clearance for under $2.  I knew that they would come in handy one day!

Now you make one! 

happenings

      2 Comments on happenings

Hmmmmm…..
Let’s see…..
The summer:

  • The girls went to two different week-long camps
  • I’ve been nursing a torn rotator cuff and some other fancy-named tear in my shoulder area  (I swear I’m falling apart.)  I’m crossing my fingers that I won’t need surgery.  But at this point, I’ll sign up for whatever takes away the pain.  It feels like I have a toothache in my arm.  Make sense?  I don’t know how else to describe it.
  • I’m going to apply to be a guinea pig at Vanderbilt University’s research hospital because nothing (not even the thought of seeing DO in the buff) is making my blood pressure rise
  • We have another week-long vacation planned to the northeast.  I’m really looking forward to yummy, greasy Boardwalk and diner food (you can bet I’ll take and post lots of pics!)
  • Looked at a couple more houses, but at this point a lateral move is not what we are looking for.  So this time I went to Williams-Sonoma and bought some stuff.  (See previous post.)

Composition Book with File Folder: Tutorial

      Comments Off on Composition Book with File Folder: Tutorial

Here is the tutorial to make this multi-functional composition book with attached file-folder.


Supplies:

Regular-size composition book

Empty cereal box

Eight envelopes, approximately 5″ x 7″ (but not larger)

Stamp set and permanent ink

12 x 12 card stock, 12 x 12 decorative cardstock, and several pieces of scraps

Tab punch

Corner-rounder punch

Crop-a-Dial

Paper cutter

Glue

Ribbon

Tutorial:


1)  grab the composition book

2 & 3)  stamp a fun stamp in permanent ink on 12 x 12 paper

4)  cut 12 x 12 paper at 9 3/4″, then cut the remaining piece at 6″, so you will end up with two pieces that are 6″ x 9 3/4″, and one piece that is 2 1/4″ x 12 ” 

5)  corner-punch the top and bottom corners on one side only of both 6″ x 9 3/4″ pieces of cardstock, so they will fit nicely on the corners of the composition book

6)  glue each piece to the front and the back of the composition book, leaving the binding uncovered

7)  cut a piece of decorative cardstock 4″ x 9 3/4″

8)  glue the 4″ x 9 3/4″ piece to the binding of the composition book by wrapping it around from front to back, as shown

THAT’S ALL FOR THE BOOK!  NOW ON TO THE FILE FOLDER…

***********

Cut one piece of decorative cardstock 6″ x 7 3/4″

Cut a piece out of the cereal box 6″ x 7 3/4″

Glue the decorative cardstock to the decorated side of the cereal box

 Cut a piece of ribbon 22″ long and attach to the backside of the cereal box

 Tie a nice bow

 NOW YOU’RE DONE WITH THE FILE FOLDER COVER…LET’S MOVE ON TO THE FILE FOLDER…

**********


9)  cut a piece of cardstock 7 3/8″ x 8″

10)  on the 8″ side, make a score line at every 1/2″

11)  fan-fold the cardstock, folding the first fold “UP”

12)  glue the fan-folded cardstock to the inside edge of the file folder cover, making sure to glue the “UP” piece to the cover

13)  another view

14)  cut the remaining 2 1/4″ x 12″ stamped piece of cardstock to 2 1/4″ x 7 3/4″ and glue it to the top inside edge of the cereal box, as shown

NOW LET’S MOVE ON TO THE ENVELOPES AND TABS…

**********

15)  cut the tops off of the envelopes

16)  glue each envelope into the “valley” of the fan-folded cardstock

17)  punch and attach the tabs, then glue the final envelope directly to the cover of the composition book

18)  attach tabs to the pages of the composition book and add an elastic tie

Compostition Book with File Folder

      Comments Off on Compostition Book with File Folder

Tomorrow I will post the tutorial for making this fun notebook with attached file folder.  I was given the challenge to come up with a journal/file for the 12-to-18 year-old girls in my church.  The requirements were to come up with something that was easy to use and not too bulky; something that they could not only take notes in but also could be a place for them to keep the handouts they receive in class on Sunday.

This is what I came up with.  It’s a plain composition book that I decorated.  The file folder was the fun part to make!  Come back next week for more pictures and the tutorial.

Mini Envelope Scrapbook: Tutorial

      Comments Off on Mini Envelope Scrapbook: Tutorial

You will find so many uses for this mini envelope scrapbook.  See the original post HERE.  Now for the tutorial.

Supplies: 

three or four different colors of cardstock, 1 3/8″ circle punch, tab punch, paper cutter, scoring tool, a fun stamp set and some ink

Tutorial: 

“A” is the scrapbook cover, cut one piece of cardstock 4 1/2″ x 12″, score at 1 5/8″, 2″, 5 3/8″, 8 6/8″ 

“B” are the inserts, cut three different colors of cardstock 2 3/4″ x 4″

“C” are the backgrounds, cut three of the same color of cardstock 3″ x 5 1/4″, score each piece at 1″

“D” are the envelopes, you will need three small envelopes 3″ x 4″, punch a 1/2 circle with the 1 3/8″ circle punch

BELLY BANDto hold the scrapbook closed, you will need a belly-band, made by wrapping a 1″ x 8 1/2″ piece of cardstock around the scrapbook, decorated as desired; also add a tab if desired

ASSEMBLY:

1)  After scroing the three background pieces, adhere the envelopes to the 1″ scored edge

2)  Adhere the background pieces/envelopes to the centers of each scored area of the scrapbook cover

3)  Stamp and decorate as desired